
Vacuum Food Storage Bags: How to Pack Portions and Organize Your Fridge and Freezer
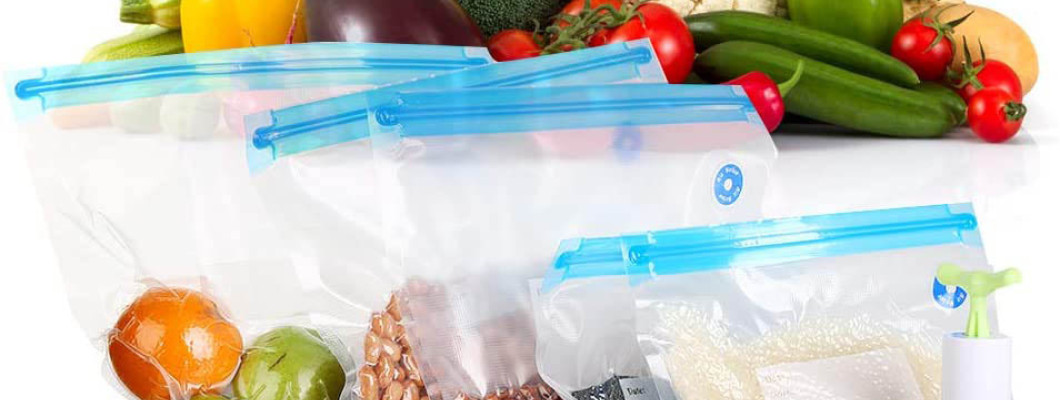
Vacuum Food Storage Bags: How to Pack Portions and Organize Your Fridge and Freezer
A freezer can be full of food and still offer no obvious answer to “What should we cook tonight?” Unmarked packages, oversized portions, and ingredients hidden behind other purchases make useful food difficult to find.
Vacuum food storage bags can form part of a more practical routine. However, the most valuable decisions happen before you remove any air: choosing a sensible portion, recording its history, and deciding where it belongs.
This guide explains how to connect those decisions. You will learn how to approach packing, organize food around everyday meals, and recognize situations where another container makes more sense. The goal is a storage system that remains understandable after shopping, cooking, and several busy days.
Quick Answer
To use a valve-style vacuum food bag, place suitable food inside, close the zipper completely, and operate the compatible pump over the valve. Label the package and promptly store it under the conditions required for that food.
Removing air does not sterilize food or replace refrigeration. Think of vacuum packing as a packaging step within a wider routine: prepare appropriately, portion sensibly, label clearly, store correctly, and use within the relevant food-storage guidance.
Contents
Identify the storage problem.
Understand what vacuum packing changes.
Choose portions and bag sizes.
Pack your first batch.
Write useful labels.
Arrange food for easy retrieval.
Adapt the routine to your household.
Avoid common mistakes.
Maintain the system.
Review the checklist and FAQs.
Start with the Problem You Actually Have
Take a quick look inside one drawer or shelf. Notice what makes it difficult to use rather than immediately rearranging everything.
Perhaps you cannot distinguish similar ingredients. Perhaps a large package contains several meals, but you only need one serving. Or perhaps groceries keep appearing on your shopping list even though you already have them.
Each problem suggests a different first improvement. Better labels address identification. Smaller portions address awkward quantities. A simple inventory addresses repeat purchases. Packaging can support these changes, but it cannot decide what your household will eat.
Choose one recurring problem for your first attempt. A modest change that fits your habits is easier to maintain than a complete reorganization requiring constant attention.
What Removing Air Does—and Does Not—Mean
Reducing oxygen exposure can help limit some changes in food quality. However, an air-reduced package is not a sterile environment, and some harmful microorganisms can grow under low-oxygen conditions.
Perishable food still requires appropriate cold storage. A tight-looking bag cannot prove that its contents are safe, and acceptable appearance or smell does not replace knowledge of storage conditions.
Avoid treating repacking as a way to rescue questionable food. Follow guidance for the particular ingredient and its preparation. There is no single extra storage period that applies to every vacuum-packed meal, vegetable, or piece of meat.
This distinction helps you use the method sensibly without confusing packaging quality with food safety.
Plan Backward from the Next Meal
Before choosing a bag, picture the moment you will open it. What will you be cooking, and how much will you need?
For one household, a useful portion might be an ingredient for a family dinner. For another, it might be enough for one lunch. Equal-sized bags do not require equal-sized portions.
Consider whether the food will be used as a main ingredient, a side, or a small addition to another dish. A portion that makes sense for one recipe may be inconvenient for another.
When household numbers vary, several manageable portions may offer more flexibility than one large package. Write down the intended use if it will help the person cooking later.
Choose Size by Shape, Not Just Quantity
Look at the food’s shape as well as its amount. A broad item and a collection of smaller pieces may need different bag dimensions even when the portions seem similar.
K&M Shopping’s Vacuum Food Storage Bags set contains 15 bags: five each measuring 34 × 25 cm, 28 × 25 cm, and 21 × 21 cm. The 20-piece total also includes a manual pump, two clips, and two zipper-sealing aids. The listing confirms refrigerator and freezer use.
Product details are available here:
https://k-m.store/shop/en/vacuum-food-storage-bags
The stated measurements are dimensions, not declared capacities in litres. Select a bag that accommodates the portion without forcing the closure.
Avoid planning around an assumed weight limit. If a portion does not fit comfortably, change the portion or choose another suitable package.
Set Up Before Taking Food Out
Prepare your labels, writing tool, packaging, and storage space before beginning. Decide where each completed portion will go so you do not finish packing and then discover that its intended drawer is full.
Use clean hands, utensils, and work surfaces, and keep raw foods separate from ready-to-eat foods. Handle shared objects such as pens and drawer handles with clean hands.
Work through a manageable batch rather than spreading everything across the counter. This also makes it easier to track which portions are finished.
Keep a clear distinction between empty packaging, food awaiting packing, and completed portions. Even a simple left-to-right arrangement can reduce confusion when several similar items are involved.
Step-by-Step: Pack Your First Portion
Step 1: Inspect the bag and select suitable, appropriately prepared food. Leave the zipper and valve unobstructed.
Step 2: Fill without overpacking. Keep the closure clean and dry, then close it fully.
Step 3: Position the pump upright over the valve. Pump until the bag contracts, stopping before delicate contents crush or liquid approaches the valve.
Step 4: Label and promptly refrigerate or freeze as appropriate.
Finish by recording the portion in your inventory. Packing is only useful if you can identify and locate the result later.
Start with one portion and review the process before repeating it. Notice whether the bag size, label position, and chosen storage location actually work together.
Use Labels That Answer Real Questions
A useful label should help someone who did not pack the food. “Dinner” may make sense today but become meaningless next week.
Record the food name, its relevant preparation or opening date, and whether it is raw or cooked when that distinction matters. Add the portion’s intended use if helpful.
If food has already been stored before repacking, preserve the important original date. A new package does not start its history again.
Choose a date format everyone understands. Keep names consistent too: two different household names for the same ingredient can make a stock list confusing.
Position the writing where it remains visible after storage. Information hidden beneath a fold cannot help you choose dinner quickly.
Decide Between Refrigeration and Freezing Early
Choose the storage destination according to the food and your intended use, rather than whichever compartment has room.
FoodSafety.gov recommends a refrigerator temperature of 4°C or below and a freezer temperature of −18°C or below. Refrigerate perishables within two hours, or within one hour when exposed to temperatures above 32°C.
Cool leftovers promptly in suitable shallow containers; do not leave them on the counter waiting to become completely cold. Follow food-specific guidance when preparing them for further storage.
Plan thawing ahead using appropriate guidance for the food and its packaging. Special instructions matter, particularly for foods supplied in reduced-oxygen packaging.
Keeping the storage decision separate from the packing task helps prevent last-minute improvisation.
Create a Layout You Can Use While Cooking
An arrangement that looks tidy with every package present may collapse once several portions are removed. Aim for a layout that remains understandable as stock changes.
Group food by categories that suit your cooking: meal components, suitable baked goods, or prepared dishes, for example. Maintain appropriate separation between raw and ready-to-eat foods.
Keep labels facing the direction from which you normally read them. Avoid burying commonly used items beneath a stack that must be dismantled.
You do not need a different organizer for every category. Begin with clear locations and familiar names. Add physical dividers only if they solve a repeated retrieval problem.
The practical test is whether you can find one portion without moving most of the others.
Build an Inventory That Takes Little Effort
An inventory should be easier to maintain than the problem it solves. A short paper list or shared phone note may be enough.
Use three basic details: food name, number of portions, and location. Add dates where needed for your planning, while retaining the information on each package.
Update the list when you put food away or take it out. Waiting until the end of the week makes small changes harder to remember.
If multiple people cook, agree on one place for the list. Separate records tend to drift apart.
You can also add a planned meal beside selected ingredients. This turns a passive stock list into a practical starting point for your next shopping trip.
Match the Routine to Your Household
For someone cooking alone, portion size may be the main improvement. Plan quantities that match meals you genuinely prepare, rather than an ambitious schedule you rarely follow.
For a family, coordination may matter more. Clear descriptions help another person identify the correct ingredient without opening several packages or interrupting whoever packed them.
For an irregular schedule, avoid assigning every portion to a fixed day. Keep a small selection of realistic meal options and choose among them as plans change, within suitable storage limits.
For frequent grocery shoppers, check existing stock before adding another package of a familiar ingredient. The storage routine should inform purchasing, not simply make room for more food.
Know When Another Container Is Easier
Vacuum packing does not need to become your default for everything. A suitable rigid container may be more practical for liquids, fragile shapes, or food you access repeatedly in small amounts.
Product images are not preparation instructions for every fruit or vegetable shown. Check guidance for the specific food before choosing how to package it.
For this set, microwave, oven, boiling-water, and sous-vide compatibility are unconfirmed. Transfer food to appropriate cookware for heating.
The best choice is the package that suits both the food and the next step in its use. Moving everything into matching bags can create unnecessary work when an existing suitable container already serves the purpose.
Avoid the Mistakes That Create Extra Work
One common mistake is choosing the largest bag automatically. Another is trying to fit an oversized portion into a smaller bag because it is the only size nearby.
A third is organizing around appearance rather than meals. Identical portions may look consistent while being awkward for the recipes you actually cook.
A fourth is making labels too vague. A fifth is keeping an elaborate inventory that nobody updates.
Choose fewer rules that everyone can follow. For example: write the food name clearly, keep its relevant date, store it in the agreed location, and update the portion count.
If a rule repeatedly gets skipped, simplify it instead of adding another reminder to an already complicated routine.
If the Bag Expands Again
Inspect the closure, valve, and bag for debris, incomplete sealing, or damage before pumping again. Replace a bag that cannot maintain its seal.
Then consider whether the issue appears with one bag or across several attempts. Repeated difficulty is a reason to review the supplied instructions and contact the retailer when necessary.
Do not repeatedly repack food without considering its handling history. Packaging performance and food condition are separate questions.
Keep a brief note if a particular step causes trouble. A clear description—such as difficulty closing one section—is more useful when seeking help than simply saying the pump does not work.
Resolve the cause before applying the same method to a larger batch.
Keep Clean Packaging Ready for Next Time
Follow the product’s cleaning instructions. Do not reuse bags that held raw meat, poultry, or fish; reject damaged bags.
Create a distinct place for clean, fully dry packaging and another for items awaiting assessment or cleaning. Returning something to the ready-to-use drawer should mean that it is actually ready.
Keep the pump and small accessories together. Searching through several drawers for a sealing aid can turn a simple task into something you keep postponing.
At the end of a packing session, check your remaining bag sizes. Knowing which sizes you use most can guide future purchases more reliably than guessing from the number of meals you prepare.
A Weekly Review That Leads to Decisions
Before the next grocery trip, scan your inventory and look at the corresponding storage areas. Check whether the written list still matches what is there.
Notice items repeatedly passed over. Their portions may be inconvenient, their labels unclear, or their planned recipes unrealistic.
Choose an appropriate meal for usable stock within its storage guidance, then add only the missing ingredients to your shopping list.
Also review your process. Did anyone forget to update a count? Were labels difficult to read? Did the arrangement become confusing as packages were removed?
Make one useful adjustment. A smaller category list or better label position often helps more than starting the whole system again.
Before-Storage Checklist
The food and preparation method suit the intended storage.
Each portion matches a realistic use.
The bag fits without forcing the closure.
The zipper and valve area are clear.
The contents and relevant dates are recorded.
The storage destination is ready.
Raw and ready-to-eat foods remain appropriately separated.
The inventory reflects the new portions.
The equipment has an agreed storage place.
Quick Answers
Best first improvement: Fix the problem you encounter most often, whether it is identification, portion size, or finding ingredients.
Best portion: The amount that fits a real meal in your household.
Best label: One another person can understand without asking you.
Best inventory: A short list you update when food moves.
Best measure of success: Easier meal decisions and retrieval, rather than matching packages alone.
Frequently Asked Questions
Are manual vacuum bags worth using for a small household?
They may be useful when the main difficulty is dividing suitable food into manageable portions. Start with a few items you regularly use. Judge the method by whether it makes packing and retrieving those portions easier, rather than by how many bags you can fill.
Should I organize the entire freezer at once?
You do not have to. Begin with one category or drawer and keep the arrangement simple. A limited trial lets you adjust label placement, portion sizes, and inventory habits before repeating the method elsewhere.
How much food should go into each portion?
Base the amount on a meal or recipe you expect to prepare. Household size alone may not provide the answer, because ingredients serve different purposes. Use your actual cooking habits rather than assuming every bag should contain an identical quantity.
What information belongs on the label?
Include a clear food name and the relevant date, plus raw or cooked status when needed. An intended use can also help. Preserve important information from the original packaging if transferring the food would otherwise separate it from those instructions.
Does a newly packed bag need a new storage deadline?
Repacking does not automatically extend the food’s safe storage period. Retain the relevant original information and follow guidance for that particular food. Do not calculate a new deadline simply because air has been removed.
How can two people maintain the same inventory?
Use one shared list and agree to update it when portions are added or removed. Keep the names and categories familiar. A system that depends on one person remembering every change is less useful when cooking duties are shared.
What if I often change my meal plans?
Store suitable portions with several realistic uses rather than assigning every item to a rigid menu. Review what remains before buying more. Flexible planning still needs to respect the appropriate storage conditions and time limits for each food.
Should I move food out of its original packaging?
Only when there is a practical reason and the new packaging is appropriate. Original packaging may contain important preparation, allergen, or storage information. Keep those details accessible if you transfer the contents.
Can these storage bags be used for cooking?
Do not assume so. Cooking requires confirmed compatibility with the method and temperature involved. Use suitable cookware or packaging expressly intended for that purpose, and follow its instructions rather than treating cold-storage suitability as permission to heat.
How do I know whether the routine is working?
You should be able to identify a portion, find it easily, and understand how it fits a meal. The stock list should also help you shop. If maintaining the system feels harder than using the food, reduce the number of categories and steps.
Conclusion
A useful food-storage routine connects what you buy with what you will eventually cook. Vacuum bags can support that routine, but sensible portions, clear records, and accessible placement make it practical from day to day.
Start with one recurring difficulty and a small batch. Keep the changes that help your household and simplify those that do not. The result should be food you can recognize and plan around, with appropriate storage guidance remaining part of every decision.
Quick Summary
Plan the meal before selecting the portion.
Choose packaging that fits the food and its next use.
Keep meaningful dates and clear descriptions.
Arrange stock so labels remain accessible.
Update the inventory as portions move.
Review existing food before shopping again.
Read Also
To develop the routine further, explore guidance on planning meals from existing ingredients, understanding food-storage dates, and selecting containers for different kitchen tasks.
For more kitchen content and equipment from K&M Shopping, visit:
https://k-m.store/
Leave a Comment