
How to Organise a Small Entryway with a Clothes Rack and Shoe Shelves
How to Organise a Small Entryway with a Clothes Rack and Shoe Shelves
An entryway often becomes untidy through a series of small decisions. A bag lands on a chair, shoes stay beside the door and a jacket hangs wherever there is an available edge. None of these actions seems significant until getting out of the house involves searching through the same collection again.
A clothes rack with shoe shelves can give everyday belongings a clear destination. However, adding storage does not automatically create an organised entrance. The rack needs to fit the way people move through the home, and its contents need a purpose.
This guide explains how to assess your space, choose an open storage arrangement and build a routine that keeps it useful. The aim is to make leaving and returning easier without turning a narrow entrance into an overflow wardrobe.
Quick answer
Choose an entryway clothes rack by measuring the available space with doors and drawers open. Allow for garments, hangers and shoes extending beyond the frame. Keep the walking route clear and check the specifications of the exact version you intend to buy.
Use the rack for a limited selection of suitable everyday belongings. Follow assembly and loading instructions, and do not assume a weight capacity that has not been confirmed.
Contents
Identify what collects near the door
Give the rack one main purpose
Measure usable space and movement
Compare open and enclosed storage
Allocate space for clothes, shoes and bags
Assemble and test the arrangement
Adapt it to different households
Establish daily and weekly habits
Checklist and quick answers
Frequently asked questions
Identify what actually collects near the door
Before choosing furniture, observe the entrance during an ordinary week.
List the items that remain there: current shoes, lightweight outerwear, work bags, scarves or belongings waiting to go elsewhere. Separate frequently used items from things left there simply because nobody has decided where they belong.
This distinction changes the solution. A few daily essentials may need a compact, clearly arranged home. A pile of seasonal clothing needs a different storage decision.
Buying a rack for everything at once can move the clutter upwards without making it easier to manage.
Give the rack one main purpose
A multifunctional design does not need to perform every possible task simultaneously.
Decide whether your main goal is organising departure essentials, preparing tomorrow’s clothing or keeping current footwear off the floor. Add secondary uses only where they fit comfortably.
For example, a rack intended for tomorrow’s outfit should not gradually become a place for clothes awaiting washing, spare bedding and old shopping bags.
A clear purpose makes later decisions easier. When something does not support that purpose, you can return it to the appropriate storage area instead of finding another hook.
Separate everyday access from long-term storage
The entrance is a transition area. It usually works best when it contains the belongings associated with leaving and returning.
Seasonal shoes, rarely used bags and clothing kept for occasional events can remain in primary storage. Bringing all of them to the doorway makes daily items harder to identify.
Ask a practical question about each object: “Will I need this here during my current routine?”
There is no need to impose an identical limit on every household. The important point is to choose deliberately rather than allowing the available shelves to determine what accumulates.
Measure with the door open
An empty wall can look more spacious than it is during use.
Open the entrance door normally, then check nearby cupboard doors and drawers. Notice where you stand while unlocking, carrying groceries or letting another person pass.
Measure the proposed furniture position in those conditions. A rack that fits against the wall may still obstruct a handle, prevent a drawer opening fully or narrow the area where people turn.
Think of the entrance as a working space rather than a photograph. Furniture should fit its moving parts, not just its fixed boundaries.
Allow for belongings extending beyond the frame
The frame’s depth does not describe every loaded arrangement.
Hangers and garment shoulders may project forward. Bag handles can extend sideways, and long shoes may reach beyond a shelf edge.
Use representative belongings to assess this before ordering. Hold a typical hanger near the intended position and compare a frequently worn shoe with the available shelf depth.
Do not assume that a narrow frame guarantees a narrow finished setup. The relevant measurement is the space you will use once the rack contains the items it was bought to organise.
Test the walking route
Imagine coming home with a bag in one hand and shopping in the other.
Can you enter, close the door and move further inside without brushing against hanging clothes? Can someone else pass while you put your belongings away?
You do not need a universal clearance figure to recognise an awkward arrangement. Reproduce your normal movements in the empty space without creating a trip hazard.
If the proposed rack position repeatedly interrupts those movements, choose another location. A storage solution should not make the route into and out of the home more complicated.
Compare open storage with a cupboard
Open storage makes belongings visible and accessible. That can be useful for a limited group of items you use regularly.
It also keeps everything on display. If you prefer concealed contents or need enclosed storage for clothing, a cupboard may suit the job better.
Consider upkeep as well as appearance. Open storage requires a habit of returning items neatly and removing things that no longer belong.
Neither approach is automatically better. Choose according to the amount you need to store, the protection required and how you want the room to look during ordinary use.
A combined rack from K&M Shopping
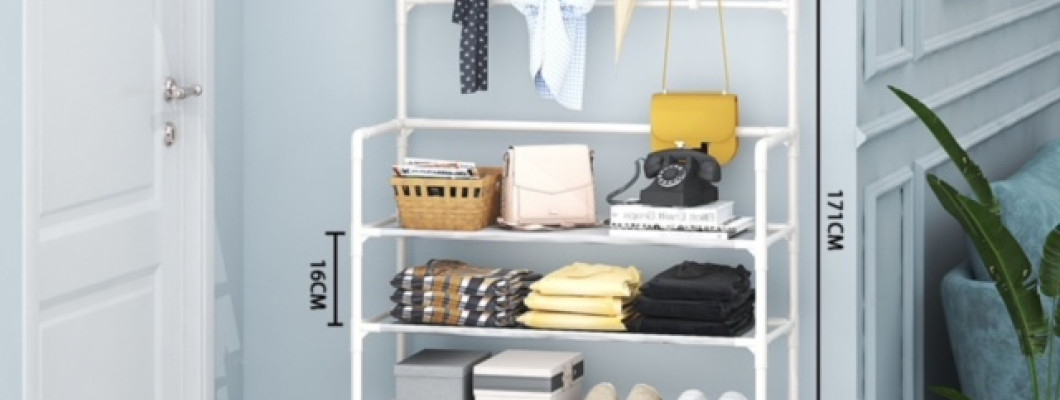
K&M Shopping lists a Multi-Function Clothes Rack with Shoe Shelves that combines an upper hanging area, hooks and open shelving.
You can review the product and available options here:
https://k-m.store/shop/en/c-stand-hanger
Confirm the dimensions and shelf arrangement of the selected version before ordering. The product information does not establish a numerical maximum load or exact material, so do not assume suitability for heavy bags or coats.
Use the confirmed layout as a starting point, then compare it with the belongings and space involved in your own routine.
Plan positions around actions
Rather than assigning items to whichever space remains, think about the order in which you use them.
What do you pick up before leaving? What do you put down immediately after arriving? Which items need to return elsewhere?
Make the most useful positions easy to reach. Less frequently used belongings should not block daily footwear or the garment you need each morning.
The arrangement does not need to look perfectly symmetrical. It needs to be understandable, accessible and consistent with the product’s loading guidance.
Keep the clothing selection small
Start with a limited group of suitable garments rather than transferring everything from the bedroom chair.
Check how the clothes hang in the available space. A long garment may rest on a shelf or touch shoes even when the overall rack is tall.
If that happens, choose another place for the garment rather than forcing the rack to serve it.
Also distinguish clean, ready-to-wear clothing from items needing laundry or further care. Mixing those categories creates uncertainty that additional hanging space will not resolve.
Give bags a clear status
A bag near the entrance can be ready for tomorrow or full of items left from several days ago.
Before allocating space, remove contents that do not need to travel with you. Decide whether the bag belongs in the departure area or should return to primary storage.
Check that the chosen position and item are appropriate for the product. Do not concentrate loaded bags on a single hook or infer carrying capacity from the size of an opening.
For heavier belongings without confirmed compatibility, use another suitable storage location.
Arrange shoes by actual size and use
Different footwear occupies different amounts of space. Trainers, sandals and boots cannot be counted as identical units.
Begin with current favourites and test whether each pair can be removed without disturbing its neighbours. Check both depth and height.
If taller footwear does not fit, keep it elsewhere rather than compressing it or changing the rack’s construction without instructions.
A useful shelf is one you can use comfortably. Filling every visible gap may increase the number stored while making the whole arrangement less convenient each morning.
Keep clean clothing separate from footwear
Combining categories in one unit requires clear boundaries.
Avoid allowing garment hems to rest on shoes, and do not place folded clothing directly on a surface carrying footwear residue without appropriate cleaning.
Designate areas by function and review whether those boundaries remain practical when the rack is in use.
A container for small accessories may help where suitable, but adding several containers can create another layer of searching. Choose them to solve a specific problem, not simply to make every shelf look full.
Leave room to retrieve things
Empty space can have a useful role.
You need room to lift a hanger, reach behind a scarf or remove a pair of shoes. If every item is tightly packed, those simple actions may require rearranging the rack.
Evaluate capacity by retrieval rather than storage alone. Can you take the item you want without touching several others?
If not, reduce the collection or move a category elsewhere. An arrangement that holds fewer things but supports daily use may be more effective than one filled to its visible limits.
Prepare properly for assembly
Read the supplied instructions and check the parts before starting.
Choose a clear working area, identify the components and follow the sequence provided for the exact product. A marketing photograph is not a substitute for an assembly guide.
If a part is missing, damaged or difficult to identify, resolve that issue before use. Do not improvise a replacement connector or assume an unclear connection will become secure once belongings are added.
Correct assembly is the starting point for evaluating the rack, not something to revisit only after a problem appears.
Check stability before organising
Place the rack on an appropriate level surface and follow its installation guidance. Use any supplied anti-tip equipment as instructed; proximity to a wall alone is not anchoring.
Keep children from climbing or hanging on the unit. Do not add weight as a remedy for leaning or an insecure connection.
If the rack is unstable or damaged, stop using it until the issue is resolved. Decisions about clothing and shelf layout come after the product is properly assembled and positioned.
Begin with a limited trial
Do not transfer the entire entrance pile immediately.
Start with a small selection of suitable belongings, then use the area through a normal departure and return. Notice where your actions differ from the plan.
If you still leave a bag on the chair, its assigned place may be inconvenient. If shoes remain on the floor, the shelf may be too crowded or blocked.
Treat these observations as information. Adjust one part of the setup before concluding that you need more storage.
Example: a shared family entrance
Agree on what belongs in the entrance: current footwear, suitable everyday outerwear and a small selection of departure essentials.
Make the arrangement clear enough for everyone to understand. Simple categories may work better than a complicated system with many exceptions.
Consider who needs access and whether the layout creates reaching or pulling problems. Do not position desirable items in ways that encourage children to climb.
Review the collection together when it becomes crowded. Shared understanding matters more than one person repeatedly restoring an arrangement nobody else follows.
Example: the bedroom clothing chair
If a chair disappears beneath clothes, first identify what those clothes represent.
Some may be ready to wear, others may need washing and others may belong back in drawers. A rack should not merge all those situations into one larger pile.
Assign it a clear role, such as holding the next day’s suitable outfit. Keep laundry in its designated place and return unused items to the wardrobe.
This changes the decision behind the clutter instead of simply giving the clutter a different structure.
Example: a small rented or shared room
Choose a position that respects other people’s routes and access to existing furniture.
Check any installation requirements against what is permitted in the property before purchasing. A freestanding appearance does not mean every product has identical anchoring requirements.
In a shared room, agree whether positions are allocated by person or by category. Keep private belongings and items needing enclosed protection elsewhere.
The aim is a predictable shared arrangement, not a rack that gradually spreads into everyone’s usable floor space.
Build a short arrival routine
Make returning items straightforward.
Put current shoes in their place, return suitable garments to their assigned position and take laundry or long-term belongings directly to the correct destination.
Avoid giving every object a temporary home on the rack. Temporary placement becomes permanent when there is no clear next step.
If something must wait there briefly, decide when it will leave. A note or an agreed review time can prevent the entrance from becoming a holding area for unfinished decisions.
Review the contents each week
During the household tidy, remove items that no longer support the current routine.
Return spare garments, review footwear and clear unnecessary contents from bags. Also notice whether belongings are spreading around the rack instead of staying within the intended arrangement.
Before buying another unit, identify why that is happening. You may need more appropriate storage, but you may also be keeping too many inactive items in a daily-use area.
A brief review is easier than waiting until every shelf requires complete reorganisation.
Adjust when routines change
A change in season, work schedule or school routine may alter the clothes and footwear you need.
Reassess the arrangement rather than continuing with positions designed for different items. Longer garments or bulkier shoes may need another storage location.
Follow the care instructions and empty the rack before moving it. Use changes in layout as an opportunity to inspect visible connections and components.
Do not relocate it to a wet or exposed area based on appearance; environmental suitability needs confirmation.
Common mistakes
Measuring the wall but not the door movement.
Ignoring garments and shoes projecting beyond the frame.
Assuming a fixed number of shoe pairs will fit.
Treating hooks as suitable for any weight.
Mixing laundry with ready-to-wear clothing.
Filling every available space.
Keeping seasonal stock in the daily departure area.
Adding storage before understanding why clutter returns.
Placement checklist
Identify the main problem.
Choose the rack’s primary purpose.
Measure with doors and drawers open.
Allow for loaded dimensions.
Keep the walking route clear.
Confirm the exact product version.
Read assembly and installation instructions.
Avoid unsupported loading assumptions.
Start with a limited collection.
Review the result during real use.
Quick answers
Best location: somewhere accessible that does not interrupt everyday movement.
Best capacity measure: what you can retrieve comfortably, not what you can squeeze onto the shelves.
Reason to choose enclosed storage: your belongings need concealment or protection the open rack does not provide.
Reason to reorganise: your routine or the size of the items has changed.
Frequently asked questions
How do I choose a clothes rack for a narrow entryway?
Measure the space during normal door use and account for belongings extending beyond the frame. Keep the route through the entrance unobstructed.
Can a rack replace my wardrobe?
It can support a limited daily collection, but it does not automatically provide the capacity, enclosure or protection of a wardrobe.
How many pairs of shoes will fit?
That depends on footwear dimensions and the available shelving. Check practical access rather than relying on the number shown in a photograph.
Can this rack hold heavy bags?
A numerical load rating is not confirmed. Do not assume suitability for heavy belongings; follow any supplied limits and choose appropriate storage for heavier items.
Why does a rack fit on paper but feel too large?
Clothes, hangers and shoes may project beyond the frame. Door movement and the space needed to reach shelves also affect the usable footprint.
Will long garments fit above the shelves?
Check the actual hanging clearance against the garments. Overall height alone does not establish whether hems will clear the contents below.
Can I use it outdoors?
Do not assume outdoor suitability without a confirmed rating. Appearance does not establish resistance to moisture or weather.
Why does clutter return after organising?
The rack may contain too many categories or items unrelated to daily use. Review its purpose and return inactive belongings to primary storage.
Can I move the rack while it is loaded?
Empty it before moving and follow the supplied handling instructions. Prepare the destination first.
When should I choose a different storage solution?
Choose another option when the required capacity, load, protection or available space does not match the product and your routine.
Step by step: getting started
Observe what collects near the door and choose one main task for the rack. Measure movement and loaded space, then confirm the selected version’s specifications.
Assemble according to the instructions, begin with suitable essentials and test a normal day. Adjust inconvenient positions and remove items that do not belong.
Conclusion
A useful entryway rack makes familiar actions easier: finding belongings, putting them away and moving through the home.
Choose around those actions, respect the product’s limits and keep the collection focused. Organisation works best when the furniture supports the routine rather than becoming another place for postponed decisions.
Quick summary
Define the purpose, measure real use and confirm specifications. Allow room for belongings and movement, keep categories clear and review the collection regularly.
Read also
For improving visibility inside existing wardrobe storage, explore:
https://k-m.store/shop/en/blog/closet-lighting-without-wiring-guide
For home organisation accessories, visit K&M Shopping:
https://k-m.store/
Leave a Comment