
How to Choose an Extra Car Cup Holder: Seat Gap Fit, Cup Sizes and Everyday Organization
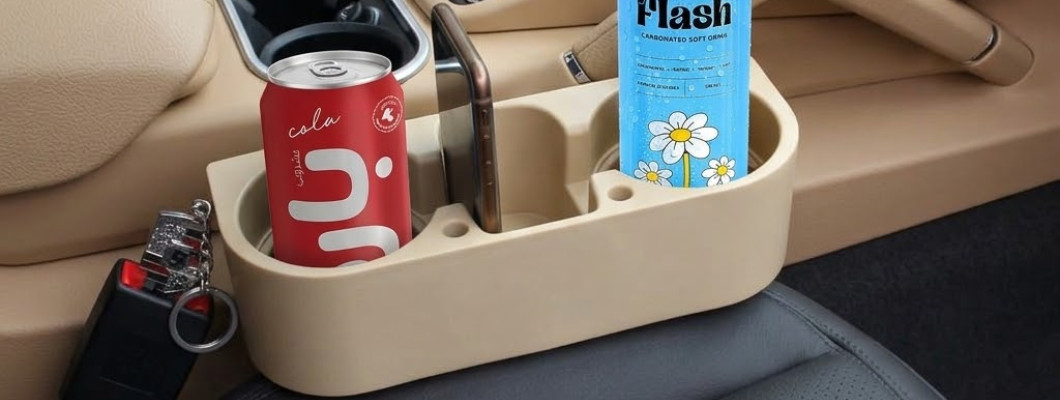
How to Choose an Extra Car Cup Holder: Seat Gap Fit, Cup Sizes and Everyday Organization
Your car has built-in cup holders, yet there never seems to be a suitable place for everything. One opening contains coins and receipts, another holds a bottle, and a passenger arrives with a drink of their own.
An additional cup holder might help, but choosing one involves more than counting the available openings. The accessory needs to work with your particular interior, seating position, and drink containers. It should also fit into a routine that keeps preparation and adjustments separate from driving.
This guide walks through the decisions to make before ordering a seat-side organizer. You will learn how to identify the actual problem, collect useful measurements, evaluate missing information, and check the arrangement while parked.
Quick Answer
Choose an extra car cup holder by checking three things: the installation space, the containers you intend to use, and the surrounding vehicle functions. Compare the relevant measurements rather than relying on photographs or a general vehicle description. Complete setup while parked, follow your vehicle manual, and reject any arrangement that interferes with normal operation or safety equipment.
Contents
Identify why you need another cup holder.
Review your existing storage.
Understand different accessory types.
Read the product specifications.
Measure your actual installation area.
Check cup and bottle compatibility.
Plan what belongs in the organizer.
Carry out a parked fit check.
Adapt the setup to everyday journeys.
Avoid common buying mistakes.
Follow the checklist and FAQs.
Start with a simple step-by-step plan.
Identify the Job You Want It to Do
Think about the last time the existing arrangement felt inconvenient. Was there genuinely no place for a second drink, or was the original holder occupied by unrelated belongings?
Perhaps your usual reusable cup has an awkward shape. Perhaps the issue appears only when a passenger travels with you. These situations may require different solutions.
Write down the task in a short sentence. “Provide a suitable place for a passenger’s bottle” is more useful than “organize the car.”
That specific goal gives you a way to assess the purchase afterward. You can ask whether it solved the problem without creating another inconvenience, rather than judging success by how tidy the interior looks immediately after setup.
Review the Storage You Already Have
With the vehicle parked, empty the area you want to reorganize. Sort the contents into everyday essentials, occasional items, and things that should leave the car.
A surprising amount of apparent storage shortage can come from keeping old receipts, unused cables, or empty packaging in convenient spaces. Removing those items gives you a clearer picture of the remaining need.
Review the original compartments and their intended uses. An existing small-item compartment may be more appropriate for loose belongings than a drink opening.
Then repeat your original question: do you still need additional capacity? If the answer is yes, you can shop with a defined purpose. If not, try the simpler arrangement before adding another object to the cabin.
Understand What Kind of Accessory You Are Comparing
A seat-side organizer, an insert for an existing cup holder, and a simple gap filler are different products. Their names may overlap in listings, so read the placement and usage information carefully.
Identify which part supports the accessory and which part holds your belongings. Also consider whether the product occupies space that a passenger or another interior feature already uses.
Avoid choosing by the phrase “multi-purpose” alone. It describes a general intention, not a promise that every compartment accommodates every item.
Your decision should connect a specific product design with a specific location and task. If that connection remains unclear after reading the listing, ask for clarification before ordering.
The K&M Shopping Option
The Multi-Purpose Car Cup Holder from K&M Shopping is a plastic seat-side organizer with two drink openings, a small upper compartment, and a lower storage pocket.
The published overall dimensions are 28 cm wide by 21 cm high, with the upper section shown as 10 cm high. The listing includes black and beige options.
Review the product here:
https://k-m.store/shop/en/car-cup-holder-multi-purpose
The exact cup-opening diameter and installation-section thickness are not specified. These missing measurements matter when assessing a particular vehicle or cup. Overall dimensions alone cannot confirm the fit, and no numerical load capacity is stated.
Read Measurements Without Filling in the Gaps
A product’s total width does not necessarily describe the part that enters the installation space. Similarly, overall height does not tell you precisely where every compartment will sit relative to the seat.
Separate confirmed measurements from unanswered questions. Write each one beside the part it describes instead of treating a pair of dimensions as a complete drawing.
If you need to ask the seller a question, make it specific: “What is the thickness of the section inserted beside the seat?” is clearer than “Will it fit?”
Do not estimate an internal dimension from a photographed drink can. Perspective, camera angle, and container variations make that an unreliable substitute for actual measurements.
Measure in the Seating Position You Use
Park appropriately and set the seat to its normal position before measuring. An area that appears spacious with the seat moved unusually far forward or backward may not represent your everyday arrangement.
If several people use the seat, consider their usual positions too. A setup that suits one person may become inconvenient when another adjusts the seat.
Record the dimensions you can measure and take a clear photograph if you need help discussing the location. Include relevant surrounding features without sharing unrelated personal details.
Your vehicle model can provide context, but it should not replace a description of the actual interior. Existing accessories, seat settings, and interior configurations can affect the available space.
Check the Surrounding Area
Look beyond the narrow gap itself. Consider the space above it, the occupant’s normal position, and the access required for nearby equipment.
Consult the vehicle manual for guidance on accessories, seat components, and airbag areas. If the proposed location raises a question about compatibility with those systems, seek qualified advice rather than experimenting.
A product that can be pushed into a space is not automatically suitable for that location. Force, distortion, or improvised modifications are reasons to pause.
Think about ordinary use as well as appearance. Getting into the seat, fastening the belt, and using the vehicle normally should not require working around an accessory you have added.
Check Your Actual Drink Containers
Start with the bottle or cup you use most often. Capacity labels do not describe the complete shape: two containers holding the same volume may have different bases, handles, and profiles.
Record the relevant dimensions and note any handle or taper. Ask for matching holder measurements if they are not published.
Consider how the container enters and leaves the opening. A photograph showing a similar drink does not establish compatibility with your own reusable cup.
If you use several containers, assess each one separately. A successful fit for one bottle should not become an assumption about every takeaway cup you might buy. Choose around your real routine, not a hypothetical collection of drinks.
Plan the Small-Item Storage
Make a short list of belongings you want to organize. Keep it limited to items with a clear role in your regular journeys.
A frequently used cable may deserve a place. Several unidentified cables probably need sorting elsewhere. Receipts may need to leave the vehicle rather than occupy a new compartment.
Also distinguish storage from display. A space that accommodates a phone does not automatically function as a navigation mount or establish a suitable viewing angle.
Plan phone settings and any other preparations before departure. The organizer should support an orderly start to the journey, rather than encourage interaction with stored items while driving.
Prepare While Parked
An accessible object can still be a distraction. NHTSA includes eating, drinking, and phone interaction among activities that can divert attention from driving.
Complete adjustments before moving. Decide where belongings go, set up any necessary vehicle functions, and deal with packaging while parked.
If something needs attention during the journey, stop in a suitable safe location before handling it. Do not treat proximity as a reason to reach for or rearrange items while driving.
This gives your organization routine a practical boundary: preparation happens before departure, and changes happen during an appropriate stop. Driving remains the task that requires your attention.
Carry Out an Initial Fit Check
Follow the product instructions and vehicle guidance. For this organizer, the listing describes placing the lower section in a suitable seat-side gap, with clear access to the belt buckle, parking brake, and gear lever.
Begin with the accessory empty. Only after checking its placement should you try an empty compatible drink container.
Check the arrangement from the occupant’s normal position. Do not compensate for a poor fit by adopting an awkward posture or accepting reduced access to something important.
A parked check can reveal obvious problems, but it is not a crash test or a guarantee of performance in every driving condition. Never use abrupt maneuvers to test an accessory.
Scenario One: The Daily Commute
For a regular solo commute, list what genuinely travels with you. It might be a water bottle and a few personal belongings rather than a large collection of supplies.
Prepare the same limited arrangement before leaving. At your destination, take the items you need with you and remove anything that has finished its purpose.
After several journeys, review what remains untouched. If an item is never needed, it may not deserve permanent space beside the seat.
This keeps the accessory tied to a useful task. Otherwise, additional storage can gradually become another place to leave things instead of making decisions about them.
Scenario Two: Traveling with a Passenger
A passenger changes how the available space is used. An arrangement that feels unobtrusive when you travel alone may be inconvenient when someone occupies the adjacent seat.
Review the setup before departure. Consider the passenger’s normal seating position and belongings, rather than assuming your solo arrangement transfers unchanged.
Agree on what belongs in the shared area and what should remain elsewhere. Distinct places can make it easier to retrieve belongings at the destination.
At the end of the journey, remove items that belong to the passenger. Leaving them for the next trip can turn an understandable setup into an unexplained collection of objects.
Scenario Three: A Longer Journey
Longer trips often encourage overpacking the immediate cabin area. You may feel that every possible item needs to remain beside you, even when it will only be used at a planned stop.
Separate immediate travel preparation from supplies needed later. Store each category appropriately according to vehicle guidance and the nature of the items.
During a suitable stop, review what has changed. Remove empty packaging and reconsider anything no longer needed.
An organizer is only one part of the overall packing arrangement. Larger bags and shopping require their own appropriate placement and securing; they should not be squeezed into a small-item system.
Common Buying Mistakes
Choosing color before checking function
A coordinated interior is a preference, but it comes after compatibility. Check the practical requirements before deciding which appearance you prefer.
Assuming a similar car proves fit
A demonstration can explain placement without confirming your particular setup. Measure your vehicle and resolve relevant unknowns.
Treating empty space as a reason to fill it
Unused capacity does not need an object. Leaving some space available can make your routine easier to understand.
Using improvised fixes for incompatibility
Do not assume that adding packing material, adhesive, or another modification is appropriate. Follow approved instructions rather than inventing an installation method.
Keeping an inconvenient purchase in use
If the accessory causes a recurring problem, reconsider it. Time spent arranging it is not a reason to accept an unsuitable fit.
Cleaning and Resetting the Organizer
Remove the contents so you can inspect the whole area during cleaning. Follow both accessory care instructions and the vehicle manufacturer’s guidance for adjacent surfaces.
The product listing recommends a soft damp cloth followed by drying, while avoiding abrasive cleaners and excessive heat. Do not infer dishwasher compatibility from the fact that it is plastic.
Use the cleaning session to review the contents. Return only what still has a defined purpose.
If the space becomes crowded again immediately, the problem may be what you keep rather than how many compartments you have. Reduce unnecessary contents before considering another organizer.
A Weekly Review
Ask three questions during a regular parked check: Is the accessory still useful here? Has the seating arrangement changed? Are the contents still relevant?
Make one adjustment if needed. You might remove unused items, change the storage plan, or decide that a different solution would better suit the task.
If you browse for alternatives, start with the requirement you have identified. You can explore K&M Shopping here:
https://k-m.store/
Avoid replacing one vague purchase with another. The more clearly you can describe the problem, the easier it becomes to compare product information and ask useful questions.
Before-Use Checklist
I have identified the specific task this accessory should improve.
I have reviewed existing vehicle storage first.
I have measured the actual proposed location.
Important missing dimensions have been clarified.
My usual drink containers have been assessed individually.
The arrangement follows vehicle and product instructions.
Normal seating and access remain unobstructed.
Setup and adjustments are completed while parked.
I am keeping only appropriate, necessary belongings.
I am not treating the holder as a guarantee against spills.
Quick Answers
First priority: Compatibility with the vehicle and intended contents.
Most useful seller question: Ask for the missing measurement that determines your fit.
Best time to arrange belongings: Before departure, while parked.
What a photograph provides: An illustration of the design, not a complete compatibility test.
When to reconsider the purchase: When it adds inconvenience, interference, or clutter instead of solving the original problem.
Frequently Asked Questions
Will a seat-side cup holder fit every car?
No universal fit should be assumed. Compare the product requirements with your actual interior and consult vehicle guidance. Your normal seating position and the surrounding features matter alongside the available gap.
Are overall product dimensions enough?
Not always. You may also need the thickness or depth of the installation section and the internal measurements of relevant compartments. Ask for those details when they determine whether the accessory can perform your intended task.
Can I use drink capacity to predict cup fit?
Capacity alone is insufficient. Containers with the same volume can have different bases, handles, and shapes. Compare the physical container with the holder’s relevant dimensions rather than relying on the amount of liquid it holds.
Does an extra holder prevent every spill?
No. Container suitability, closure, handling, and driving conditions remain separate considerations. Do not interpret a holder as a guarantee that a drink cannot tip or leak, or as permission to handle it while driving.
Can the small compartment replace a phone mount?
A storage compartment should not be assumed to provide a dedicated mounting function. Check the stated use and dimensions. A phone fitting inside does not establish a suitable viewing position or secure mounting performance.
What if the accessory presses against the seat?
Pause and reassess the fit. Do not force it into place or modify vehicle components to accommodate it. Pressure, interference, or restricted access can indicate that the location or accessory is unsuitable.
Should I buy the color shown in the photograph?
Choose from the actual options available when ordering, after checking compatibility. Photographs help explain appearance but may not reproduce the exact shade of your vehicle’s interior. Color matching remains secondary to practical suitability.
Do I need to fill every compartment?
No. Use only the spaces you need and only for appropriate items. Empty capacity is not wasted if keeping it clear makes the arrangement more manageable. A short list of essentials is easier to maintain.
When should I repeat the fit check?
Review the arrangement when the seat position, occupant, containers, or installation changes. Also reassess after removing and replacing the accessory. An earlier fit check does not automatically cover every later configuration.
How do I know whether the organizer is worthwhile?
Return to the problem you identified before buying. Has that task become easier without causing interference or unnecessary clutter? Assess ordinary use and convenience rather than relying solely on how the finished setup looks.
Step-by-Step: Make a Confident Choice
Step 1: Define the recurring problem
Describe the task clearly before comparing products.
Step 2: Clear and review existing storage
Check whether a simpler arrangement already meets the need.
Step 3: Measure the intended area
Use normal seating positions and consider the surrounding functions.
Step 4: Resolve missing information
Ask specific questions about relevant dimensions and installation requirements.
Step 5: Check the intended contents
Use your actual cup, bottle, or other item as the reference.
Step 6: Perform a parked setup check
Follow instructions and reject arrangements that interfere with normal vehicle use.
Step 7: Keep the contents limited
Assign a purpose to each item instead of filling every opening.
Step 8: Review after ordinary use
Keep the arrangement only if it continues to serve the original task.
Conclusion
Choosing an extra car cup holder is a small purchase decision with several practical details behind it. The available space, your seating position, and the shape of your drink containers all deserve attention.
Identify the need, confirm the relevant information, and prepare the arrangement while parked. A useful accessory should fit your routine while leaving the vehicle’s original functions unobstructed.
Quick Summary
Start with a specific storage problem.
Review the built-in spaces before adding more.
Measure the actual installation area.
Ask about missing dimensions.
Check individual containers rather than capacity labels.
Complete setup before driving.
Keep only belongings with a clear purpose.
Reassess whenever the arrangement changes.
Read Also
For a separate guide to managing shopping bags and purchases in the rear cargo area, read:
https://k-m.store/shop/en/keep-grocery-bags-from-sliding-car-trunk-guide
Leave a Comment