
How to Choose Adhesive Wall Screws for No-Drill Mounting
How to Choose Adhesive Wall Screws for No-Drill Mounting
Moving a small organiser from a worktop to the wall can make a space easier to use. But if you want to avoid drilling, choosing the mounting method takes more thought than finding an adhesive pad with a screw attached.
The wall finish, accessory opening, screw dimensions and everyday handling all need to work together. A fixing that looks suitable in a photograph may not match the mounting holes on your item or the surface where you intend to place it.
This guide explains what to check before buying, what to measure before peeling away the backing and which questions need answers before loading the installation. It focuses on making a suitable choice rather than treating adhesive mounting as a universal replacement for drilled fixings.
Quick answer
Choose an adhesive wall screw only after confirming compatibility with the surface, accessory mounting holes and intended use. Check the complete loaded item, not just the empty holder, and obtain the preparation, waiting-time and loading instructions for the exact product.
“No drilling” does not automatically mean damage-free removal. Do not assume that adding more adhesive fixings increases capacity by simple addition, or that a removed pad can be reused.
Contents
Understand the mounting connection
Define the item and its everyday use
Check the surface and available contact area
Measure holes, spacing and clearance
Compare product options
Plan installation before exposing the adhesive
Apply the method to household situations
Review removal and ongoing use
Checklist and quick answers
Frequently asked questions
Understand what an adhesive wall screw does
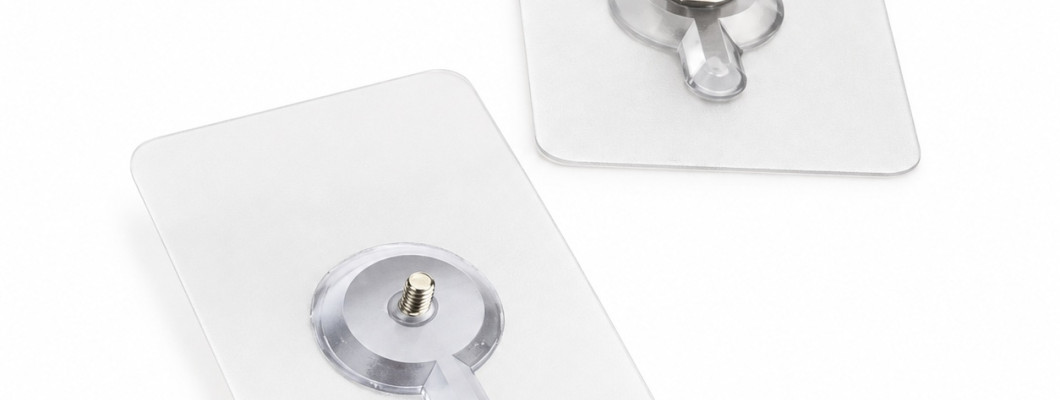
An adhesive wall screw uses a sticking base to position a projecting threaded fixing on a suitable surface. The accessory must have a compatible way to connect to that fixing.
This differs from a simple hook, which usually receives a loop or hanging point directly.
Look at the back of the item before shopping. Does it slide over a screw head? Does it need a nut? Does it rely on a particular bracket supplied by its manufacturer?
Understanding that connection prevents you from choosing a fixing merely because both products appear small.
Define one task before choosing a location
Start with what you want to improve: clearing part of a desk, positioning a small organiser within reach or giving a compatible accessory a permanent place.
Hold the item in the proposed position without attaching anything. Check whether you can use it comfortably and whether it interferes with doors, drawers or neighbouring objects.
A vacant section of wall is not necessarily a useful mounting position.
Once the location supports the task, you can assess how to attach the item. Reversing that order may leave you with a securely positioned accessory that is inconvenient to use.
Consider the complete loaded item
An empty organiser does not represent the load it will carry after installation.
List the objects that normally go inside or hang from it. Consider the intended collection rather than a deliberately reduced selection used only during the initial setup.
Where weight information is required, measure the complete arrangement with a suitable scale instead of guessing.
Knowing that weight is useful, but it does not establish compatibility by itself. You still need to understand what the fixing’s stated rating covers and whether the accessory’s mounting arrangement is appropriate.
Think about handling as well as weight
A decoration that remains still presents a different practical task from a holder that is pulled, pressed or repeatedly handled.
Notice how you use the accessory. Do you lift an item straight out, tug it towards you or press against the holder?
Do not assume that a general weight claim also confirms suitability for every repeated action.
If normal use involves significant pulling or pressure, seek a mounting method documented for that application. Choosing around the actual movement is more useful than evaluating the accessory only while it hangs motionless.
Identify the surface you will attach to
“Wall” is too broad a description.
The adhesive might contact tile, a painted finish, a panel or another covering. Identify the actual material and condition at the proposed position.
Inspect for texture, loose finish, contamination or existing damage. A surface that looks smooth from across the room may appear different up close.
If you do not know the finish, establish that before selecting cleaning products or a mounting method. Surface preparation should not become an experiment that damages the area you hoped to preserve.
Check the entire pad footprint
The screw position is only one part of the installation.
You also need enough suitable area for the whole adhesive base. Its outer edges may extend over a joint, curve or change in finish even when the centre sits in a convenient place.
Obtain the base dimensions and compare them with the available uninterrupted area.
Do not trim a pad or alter its shape unless the product instructions explicitly allow it. If the footprint does not fit, reconsider the position or choose a different mounting arrangement.
Separate no-drill installation from damage-free removal
Avoiding a drill prevents a drilled hole during installation. It does not establish how the finish will respond when the adhesive is removed.
This distinction matters if you need to preserve painted surfaces or restore a rented property later.
Ask about the removal method and surface compatibility before installation. Do not infer removability from a transparent base or a photograph showing a clean wall.
If leaving the finish unchanged is essential, make documented suitability for that requirement part of your purchase decision rather than a question for moving day.
Measure the accessory opening
Check the opening’s shape and dimensions, including the thickness of the part that will sit around the screw.
A photograph may show a threaded fixing without revealing its diameter, usable projection or compatibility with the accessory.
Also check whether a supplied nut or cover needs room to engage after the item is positioned.
When asking a seller for help, provide a close photograph and relevant measurements. A specific compatibility question is easier to answer than asking whether an unspecified organiser will “work with this”.
Check clearance behind the accessory
An opening can fit over a screw while the accessory still fails to sit correctly.
The adhesive base or another projecting part may contact the back of the item. A recessed mounting point may need a different fixing arrangement.
Look at the connection from the side as well as the front. Work through the assembly sequence and make sure you can reach any fastening parts.
Do this before sticking the base to the wall. Otherwise, you may discover too late that the next assembly step requires access that the installed accessory blocks.
Compare one-point and two-point arrangements
Choose the mounting pattern required by the accessory rather than assuming more screws are automatically better.
For an item using two points, measure the distance between the centres of its openings and check their orientation. Note whether the openings are round, slotted or shaped for a particular bracket.
Two screws on one base are useful only if the arrangement is compatible.
Do not compensate for a mismatch by bending the accessory or enlarging its holes unless its manufacturer permits that modification.
Options available from K&M Shopping
K&M Shopping lists K90 with one projecting screw and S120 with two screws on a wider adhesive base.
The exact base dimensions, screw measurements and spacing are not provided. Confirm them against your accessory before ordering.
The listing also leaves package quantity and the scope of its advertised load figure unclear. Obtain clarification for the selected option rather than interpreting the number of objects in a photograph as the package contents.
Product details:
https://k-m.store/shop/en/no-drill-adhesive-wall-screw
Treat the available designs as different connection options, not as interchangeable answers to every mounting task.
Read a load claim in context
Before relying on a stated capacity, establish what it applies to: one screw, one base or a particular installation using several components.
Check the conditions attached to the claim and compare them with your intended setup.
A descriptive term such as “heavy duty” is not a substitute for clear application information.
If the task depends on a specific capacity and the documentation does not establish it, choose a fixing system that does. This is especially important when failure could damage valuable belongings or injure someone.
Do not add capacities together
Installing extra adhesive points does not, by itself, establish how a load will be shared.
Alignment, accessory design and the mounting arrangement affect the connection. You cannot confirm a system’s capacity simply by multiplying a figure by the number of pads.
Avoid using additional pieces as a workaround for missing instructions.
If the accessory specifies a mounting system, check whether an adhesive alternative is supported. A complete, documented arrangement is more useful than several individually plausible components assembled through guesswork.
Create a simple pre-purchase note
Before ordering, record the essential information in one place:
The accessory and its intended contents.
The surface material and condition.
Opening dimensions and mounting-point spacing.
Available room for the adhesive base.
The product option and confirmed package contents.
Any unanswered installation questions.
This note helps you compare alternatives and explain your requirements accurately.
It also prevents repeated searching when the product arrives. You can check the delivered parts against the decision you made instead of starting the compatibility assessment again.
Rehearse the layout before exposing the adhesive
Use an appropriate temporary marking method or a paper template to plan the position.
Check alignment, nearby movement and access from your usual standing or sitting position. Open neighbouring doors and drawers.
A template helps with placement; it does not test adhesion or load capacity.
Step back and review the arrangement before proceeding. Correcting a temporary mark is easier than dealing with a base installed in the wrong place, particularly when repositioning and reuse have not been confirmed.
Prepare the sequence, not just the surface
Gather the instructions, measurements and components before beginning.
Decide how you will hold the accessory during attachment and where small parts will remain accessible. Make sure the required fastening sequence is possible in the chosen position.
Do not peel away the backing while still deciding between locations.
A short rehearsal reduces hurried corrections. It also highlights missing information early enough to obtain it without leaving an exposed adhesive pad or a partly assembled accessory waiting nearby.
Use the correct cleaning instructions
Follow guidance that is compatible with both the adhesive product and the surface finish.
Do not choose a solvent simply because it removes grease effectively. A cleaner may be unsuitable for the finish, leave residue or conflict with the mounting instructions.
Prepare and dry the area as directed. Do not add another adhesive or treatment to improve a result that has not yet been assessed.
If the surface-care instructions and mounting requirements conflict, resolve that conflict before proceeding rather than ignoring one set of guidance.
Confirm the waiting time before installation
Different adhesive products can have different instructions. A waiting period recommended for another brand or another type of pad should not be transferred automatically.
The exact waiting time for this product is not stated on its page. Check the supplied instructions or obtain clarification from the seller before loading it.
Plan around that requirement.
Feeling attached when pressed is not a reliable reason to shorten an instructed waiting period. Having the information beforehand avoids a rushed decision when you need the accessory immediately.
Distinguish an installation check from a capacity experiment
After following the confirmed instructions, inspect alignment and the accessory connection.
This is not an invitation to add increasingly heavy objects until something fails. Do not use household possessions to discover an undocumented limit.
A brief period of successful hanging does not establish permanent suitability for a different task.
If your intended use requires a particular performance level, obtain that information in advance. Choose a documented solution rather than treating installation as a trial to determine unknown capacity.
Example: moving a small desk organiser
Before mounting a desk organiser, fill it with the items you normally use and examine how you retrieve them.
If you pull the organiser forward whenever you remove something, include that action in the compatibility question. Also check that it will not obstruct cables, switches or your working position.
Try the location by holding the organiser in place.
You may discover that moving it to another part of the desk solves the problem more simply. Wall mounting is useful when it improves the task, not merely because an empty wall is available.
Example: a bathroom accessory
Describe the actual environment and intended use rather than relying only on a general bathroom label.
Consider whether the item will be splashed, handled frequently or filled with additional containers later. Check that the product documentation supports the arrangement you have in mind.
A water-resistance statement alone does not answer every installation question, including preparation or waiting time.
Avoid choosing an adhesive fixing for a support or other application whose failure could cause injury. Those tasks need an appropriate, documented mounting system.
Example: a rented home
In rented accommodation, distinguish your preference to avoid holes from the requirement to preserve the property’s finish.
Check any relevant restrictions before installing, and retain the removal guidance with the product information.
If an acceptable removal method cannot be established, consider a freestanding organiser or another arrangement that suits the property.
The best solution may be the one that avoids uncertain surface changes altogether, rather than the one with the simplest installation photograph.
Plan removal before you need it
Keep instructions for taking the accessory down and removing the base.
When removal becomes necessary, empty and support the item before following the specified procedure. Do not begin with aggressive pulling, heat, sharp tools or chemicals without appropriate guidance.
Reusability is not confirmed for this product. A pad that remains sticky after removal should not be treated as verified for another loaded installation.
If you expect to move the accessory regularly, choose a system with documented repositioning or reuse capability.
Review the setup when its purpose changes
An organiser can gradually acquire more contents than you originally planned.
Treat a larger collection, a different accessory or a new handling action as a reason to reassess compatibility. The original decision does not automatically cover every later use.
During routine cleaning, look for changes in alignment, movement or the base’s condition. Remove the load if the fixing shows deterioration rather than repeatedly pressing it back and continuing.
Inspection is a chance to notice problems, not a replacement for suitable specifications.
Common mistakes
Buying before measuring the accessory.
Confusing screw count with package quantity.
Checking only the centre of the adhesive area.
Copying another product’s waiting time.
Assuming additional pads guarantee additional capacity.
Promising damage-free removal without evidence.
Reusing a removed pad without confirmation.
Changing the mounted contents without reassessment.
Before-installation checklist
Identify the item and its normal use.
Confirm the surface and complete contact area.
Measure the holes and required clearance.
Verify the selected option and contents.
Clarify relevant capacity information.
Obtain preparation and waiting-time instructions.
Rehearse the position.
Keep removal guidance available.
Resolve essential unknowns before loading.
Quick answers
Most useful measurement: the complete connection, including opening size, spacing and clearance.
Best time to ask questions: before ordering or exposing the adhesive.
Reason to choose another system: compatibility or required performance remains undocumented.
What a photograph cannot prove: delivered quantity, exact dimensions, load performance or removal behaviour.
Frequently asked questions
What is an adhesive wall screw?
It is an adhesive mounting base with a projecting threaded fixing for a compatible accessory. It requires both a suitable surface and a suitable connection.
How do I choose between one screw and two?
Follow the accessory’s mounting requirements. For two points, confirm spacing and orientation rather than choosing solely by screw count.
Will it work on every wall?
No. Identify the actual finish and confirm compatibility. A successful installation on one material does not establish suitability for another.
How long should I wait before loading it?
Use the instructions for the exact product. The page does not specify a precise duration, so obtain that information before loading.
Can I double the capacity by using two bases?
Do not assume that. A combined installation needs documented suitability; simple arithmetic does not establish load sharing.
Is removal guaranteed not to damage paint?
No general guarantee is established. Check the surface and removal instructions before installation if preserving the finish is essential.
Can I remove and reuse the same pad?
Reuse is not confirmed. Remaining tackiness does not demonstrate that the pad is suitable for another loaded installation.
Can it hold a valuable or breakable object?
Choose a mounting system explicitly suitable for that object and location. Do not rely on unclear capacity information where failure would have serious consequences.
What should I do if an edge starts lifting?
Remove the load and stop relying on the fixing. Investigate the cause and follow replacement guidance rather than simply pressing it back.
How do I confirm what comes in the order?
Ask for the contents of the selected option, including bases and required fastening parts. Do not infer quantity from a display photograph.
Step by step: start with the information
Define one task, inspect its surface and measure the accessory. Confirm the option, dimensions, contents and installation requirements.
Plan the location, prepare according to the instructions and observe the specified waiting time. Use the installation only within its confirmed application and reassess it when anything changes.
Conclusion
No-drill mounting works best when the decision begins with compatibility. The surface, accessory and fixing need to form a suitable arrangement before installation starts.
Resolve essential unknowns early and choose a documented alternative when necessary. Convenience comes from selecting the right method for the task.
Quick summary
Measure first, confirm the option and check the complete connection. Follow product-specific preparation and waiting instructions. Do not assume additive capacity, damage-free removal or reuse.
Read also
For an alternative approach using freestanding storage, explore the small entryway organisation guide:
https://k-m.store/shop/en/small-entryway-clothes-rack-shoe-storage-guide
For household organisation and maintenance accessories, visit K&M Shopping:
https://k-m.store/
Leave a Comment