
Water Collecting Around Your Faucet? A Guide to Choosing and Using a Silicone Sink Mat
Water Collecting Around Your Faucet? A Guide to Choosing and Using a Silicone Sink Mat
You wipe behind the kitchen faucet, wash a few dishes and find another small puddle near the soap dispenser. In the bathroom, droplets appear around the tap after handwashing, even though most of the surrounding surface remains dry.
A silicone faucet mat can provide a place for those droplets to land and a route back towards the basin. However, its usefulness depends on where the water comes from, whether the opening fits the faucet and how the draining section sits against the sink.
Before choosing one, look at the area as a complete setup. The faucet base, nearby wall, basin edge and soap dispenser all affect how the mat can be positioned. This guide explains what to measure, how to test the arrangement and what to do if water still collects.
Quick Answer: How Can You Reduce Water Around a Faucet Base?
Dry the area and identify when the water appears. If it comes from ordinary splashes or wet hands, a correctly fitted drainage mat may help collect droplets within its footprint and guide them towards the basin.
Check the faucet opening, available counter space and drainage route before buying. Keep the outlet clear and lift the mat regularly to clean and dry underneath. If water appears without using the sink, investigate its source rather than covering it with a mat.
Contents
Identify where the water comes from.
Understand what a faucet mat can do.
Measure the installation area.
Check the faucet base and drainage route.
Review the K&M Shopping product.
Install and test the mat.
Arrange soap and cleaning accessories.
Troubleshoot water above and below the mat.
Follow a care routine.
Read ten frequently asked questions.
Start by Identifying the Source of the Water
Remove the objects around the faucet and dry the surface. Then use the sink normally while watching where the first droplets appear.
Water may fall from your hand as you reach for the handle. It may bounce off a dish or run down the outside of a wet soap bottle. Each source creates a different pattern around the faucet.
If moisture returns while the sink is not being used, treat that as a separate observation. A mat is not a seal or plumbing repair. Check the source and arrange an appropriate inspection when necessary instead of assuming that collecting the water resolves the cause.
Understand Collection Versus Splash Prevention
A mat around the faucet base is not an upright barrier around the sink. It receives water that lands on its surface and helps guide that water towards the basin.
Droplets landing beyond its edges remain outside its coverage. If a large bowl redirects water across the countertop, changing the bowl’s position may matter more than adding another accessory.
This type of silicone mat also works differently from an absorbent cloth. Its purpose is drainage rather than soaking up water. If puddles remain on top, check the position and drainage path instead of expecting the material to absorb them.
Measure the Actual Installation Area
Start with the usable space behind and beside the faucet, not the overall width of the sink. A broad countertop can still have very little clearance between the faucet and the wall.
Look for fixed dispensers, raised edges and other fittings that could interrupt the mat’s footprint. Measure around these obstacles rather than imagining they are not there.
You can draw the product’s outer dimensions on paper as a rough planning aid. This helps visualise the footprint, but it does not prove that the faucet opening or drainage section will align. Remove the paper after checking and assess the remaining details separately.
Check the Faucet Base Shape
Faucet bases vary. Some are compact and round, while others sit on a wide plate or have an irregular shape.
Measure the part the mat needs to fit around and note any nearby projections. A flexible material does not automatically accommodate every base, and stretching should not be treated as a substitute for compatibility.
The exact opening size of the K&M Shopping mat is not stated in the available listing. Product images can help explain its form, but they cannot establish an exact fit. Ask for clarification if the base is wide or unusual rather than relying on appearance alone.
Follow the Route from the Mat to the Basin
The draining section needs to direct water into the basin rather than onto another part of the surrounding surface.
Check the distance between the faucet base and the bowl opening. A raised rim, a change in surface level or a curved installation area may affect how the mat sits.
Do not assume that sufficient width guarantees useful drainage. The mat must also rest appropriately along the route the water needs to take.
Avoid using improvised packing underneath to force a slope. If the geometry does not suit the product, reconsider the fit instead of creating an unstable or folded arrangement.
What the K&M Shopping Faucet Mat Offers
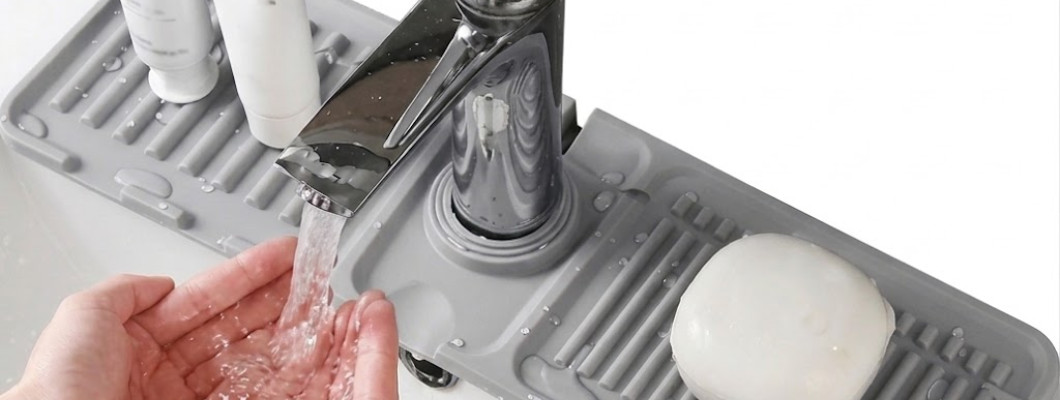
K&M Shopping lists a grey faucet mat made from flexible silicone, measuring 27.5 × 11.5 cm. It is positioned around the faucet base without tools and is intended to help return collected droplets towards the sink.
The listing identifies kitchen sinks, bathroom basins and handwashing areas as possible locations, subject to fit. The package contains one mat.
Review the product here:
https://k-m.store/en/kn15-tap-water-spray-mat
The available information does not state the opening diameter, thickness, heat rating or dishwasher suitability. The confirmed cleaning method is water and mild soap, followed by rinsing and drying.
Decide Whether It Matches Your Situation
The mat may be useful when ordinary droplets repeatedly collect near the faucet and the installation area provides a clear route into the basin.
It is also important that you can remove it easily. A setup requiring several fixed accessories to be dismantled for cleaning would make routine maintenance inconvenient.
It may not suit an unusually wide faucet base, insufficient rear clearance or a strongly sloped surface. It should not be selected to conceal a persistent leak.
Think of the decision as matching a particular mat to a particular sink. A successful installation elsewhere does not establish that your faucet and countertop have the same layout.
Prepare the Area Before Installation
Move the soap bottle, sponge and other belongings away from the faucet. Clean the exposed surface using a method appropriate to that surface, then dry it.
Inspect the mat and identify the opening and draining side before fitting it. Follow the design and any supplied instructions rather than beginning by loosening plumbing fittings.
The product is described as installing without tools. If its intended placement is unclear, seek clarification instead of cutting the opening or modifying the faucet arrangement.
Start with the mat empty. Keeping dispensers and accessories off it during the first test makes it easier to see whether the basic fit works.
Fit It Without Distorting the Shape
Position the mat around the faucet base and orient the draining section towards the basin. Check that it rests appropriately rather than buckling around the opening.
Move the faucet handle through its normal range. The mat should not obstruct operation or be pushed out of position whenever the handle moves.
Look along the edges for parts lifted by a nearby fitting or wall. A flexible edge forced into a confined space can change the drainage arrangement.
Do not treat pressure as the solution to a poor fit. If the mat cannot sit properly without being forced, reassess compatibility before continuing.
Test with Ordinary Use
Wash your hands or rinse a small item as you normally would. Observe the droplets that reach the mat and the direction they take.
There is no need to pour a large volume over it. You are checking its behaviour under the conditions that caused the everyday problem.
After the test, inspect the surrounding area and lift the mat to check underneath. If you find water below it, dry the surface and examine how it arrived.
Repeat after making a sensible positional adjustment. If the arrangement remains unsuitable, recognise that limitation rather than assuming that heavier use will make it settle into place.
Add a Soap Dispenser Only If It Fits
The product description allows a small dispenser on a side section when space permits. That is conditional on the installation, not an invitation to cover the mat with bottles.
Add one stable container and check what happens when you operate its pump. If pressing it moves the bottle, distorts the mat or blocks drainage, use another location.
Consider cleaning access as well. A crowded mat that requires several items to be removed may be less likely to receive regular checks.
Keep the drainage route visible. The arrangement should remain understandable at a glance, with water able to move towards the basin.
Keep Tool Storage and Water Collection Separate
A faucet-mounted organiser and a drainage mat serve different purposes. One provides a place for suitable accessories; the other collects droplets around the base.
Using both may be possible, but review their combined footprint. Check that the organiser does not press on the mat, obstruct the handle or block the draining section.
An additional accessory should solve a specific need rather than simply fill available space. Sometimes moving the sponge elsewhere leaves a more practical faucet area.
Avoid assuming that the mat is a full drying rack. The listing does not establish a load rating or capacity for a collection of utensils and washing tools.
Kitchen Example: Washing a Large Pot
A setup may work well for plates but behave differently when a large pot enters the sink. The pot can redirect water or push a nearby bottle against the mat.
Before washing, check that the vessel has enough working space. Move accessories temporarily if needed rather than forcing them backwards.
Afterwards, inspect the mat’s position. If it shifted, reset it before the next use instead of leaving the drain path obstructed.
Water landing beyond the mat during this task does not necessarily mean the mat is incorrectly fitted. It may simply be outside the area the product can collect.
Bathroom Example: Reaching for Soap
Around a bathroom tap, droplets may come from the movement between washing, using soap and closing the handle.
Observe that sequence before deciding where the dispenser should sit. A different bottle position may reduce unnecessary dripping across the surface.
Check that the mat does not make a compact basin feel crowded or restrict access to the controls. Keep toothbrush cups and other belongings separate unless there is an appropriate independent place for them.
For a shared bathroom, agree to leave the drainage section uncovered. A simple return position for the soap bottle can prevent repeated adjustments throughout the day.
When Water Remains on Top
First remove any objects from the mat. Check whether it lies correctly and whether its draining side still reaches towards the basin.
Look for soap residue or debris affecting the channels. Wash the mat, clean beneath it and reassess after drying.
Do not enlarge channels with sharp tools or cut sections away to create a different water path. Modification is not a substitute for a suitable fit.
If water repeatedly collects despite correct placement and cleaning, the surrounding sink shape may not suit the design. Evaluate that possibility instead of adding more objects underneath or forcing the edges into position.
When Water Appears Underneath
Lift the mat and determine where the moisture is concentrated. Water may arrive from outside its coverage, around the faucet opening or through an unsuitable placement.
Dry the area before testing again so that old moisture does not confuse the observation. Compare what happens during normal use with what happens when the sink remains unused.
Do not leave the mat in place simply because the upper surface looks tidy. Its condition underneath is part of evaluating the setup.
If moisture continues without use, investigate the source independently. A collection accessory should not delay attention to a possible plumbing issue.
Make Cleaning Part of the Routine
Remove any dispenser, then lift the mat and wash it with water and mild soap as directed by the listing. Rinse thoroughly and allow it to dry before reinstalling.
Avoid sharp cleaning tools and harsh products. Dishwasher use is not confirmed, so follow the stated method rather than assumptions about silicone generally.
Clean the sink surface underneath according to its own care requirements and dry it too. A cleaner suitable for the basin is not automatically appropriate for every accessory.
No antibacterial or self-sanitising property is confirmed. Regular cleaning remains necessary, even when the mat appears to drain effectively.
Review the Setup After Small Changes
A replacement soap bottle may have a wider base or a pump requiring more pressure. A new organiser can occupy space that previously allowed the mat to sit flat.
After changing an accessory, check stability and the drainage route again. Do the same if the faucet itself is replaced.
Between cleanings, make a brief visual check after heavy use. Remove anything covering the outlet and investigate unusual water accumulation.
The frequency of deeper cleaning should reflect actual conditions. Lift the mat more often when you notice retained moisture or residue rather than relying on a schedule that ignores what is happening underneath.
Common Mistakes to Avoid
Do not choose by outer dimensions alone. Faucet-opening fit and the route to the basin are equally important.
Do not assume flexibility means universal compatibility, or that grey silicone has a particular heat rating. Product-specific information matters.
Avoid crowding the mat with dispensers and leaving it untouched for long periods. Both can make drainage and inspection harder.
Finally, do not judge success as the complete absence of water anywhere around the sink. The useful question is whether the correctly fitted mat helps manage the droplets within its area while remaining easy to clean.
Before-You-Buy Checklist
Measure the space behind and beside the faucet.
Compare it with the 27.5 × 11.5 cm footprint.
Check the faucet-base shape and dimensions.
Ask about the opening when compatibility is uncertain.
Examine the route from the mat into the basin.
Identify raised edges or fixed obstacles.
Plan easy access for removal and cleaning.
Keep the drainage section clear.
Do not rely on the mat to repair a leak.
Avoid assuming unlisted cleaning or heat-resistance features.
Quick Answers
For repeated droplets: Identify their source before choosing an accessory.
For compatibility: Check the opening, footprint and drainage route together.
For soap placement: Add a small dispenser only if it remains stable and leaves drainage clear.
For moisture underneath: Lift, dry and investigate the path.
For care: Use water and mild soap, then rinse and dry.
For splashes beyond the mat: Review the activity; coverage is limited to the mat’s footprint.
Frequently Asked Questions
1. What does a silicone faucet mat do?
It collects droplets landing around the faucet base and helps direct them towards the basin. Its effectiveness depends on fit, placement and a clear drainage route.
2. What size is the K&M Shopping mat?
The listed dimensions are 27.5 × 11.5 cm. These describe the outer size, not the faucet opening, which must be considered separately.
3. Will it fit every faucet?
No universal fit is confirmed. Wide or irregular bases and limited clearance may cause problems. Ask for additional measurements when the product information does not resolve compatibility.
4. Does it keep the countertop completely dry?
It cannot collect droplets falling outside its coverage or guarantee that no moisture reaches underneath. Continue checking and wiping surrounding areas when necessary.
5. Can it fix a leaking faucet base?
No. It is a water-collection accessory, not a plumbing repair or seal. Persistent moisture without normal sink use needs separate investigation.
6. Can it be used in both kitchens and bathrooms?
Both are listed uses, provided the faucet base, available space and drainage arrangement are compatible. Suitability must be checked for each installation.
7. Can a soap dispenser stand on it?
A small dispenser may be placed on a side section when the setup allows. Remove it if it shifts, distorts the mat or blocks water flow.
8. Is it dishwasher-safe?
Dishwasher suitability is not confirmed. The stated care method is washing with water and mild soap, followed by rinsing and drying before reinstalling.
9. Does installation require removing the faucet?
The product is described as fitting without tools. Follow its intended design and seek clarification if necessary rather than starting by dismantling faucet fittings.
10. What comes in the package?
The listing specifies one grey faucet mat. Soap dispensers and other accessories should not be assumed to be included.
Start with a Clear Surface and One Test
Install the mat on a clean, dry area without additional objects. Observe normal use, check above and below, and confirm that the water has a useful route into the basin.
Only then add any suitable dispenser and repeat the check. If the fit is wrong, do not rely on cutting, stretching or improvised supports.
Review the product details here:
https://k-m.store/en/kn15-tap-water-spray-mat
For other products available from K&M Shopping, visit:
A practical faucet setup begins with understanding where water lands. Match the mat to the space, keep its drainage route clear and make checking underneath part of ordinary sink care.
Leave a Comment