
Where to Put Pot Lids and Cooking Spoons: A Practical Guide to Utensil Rests
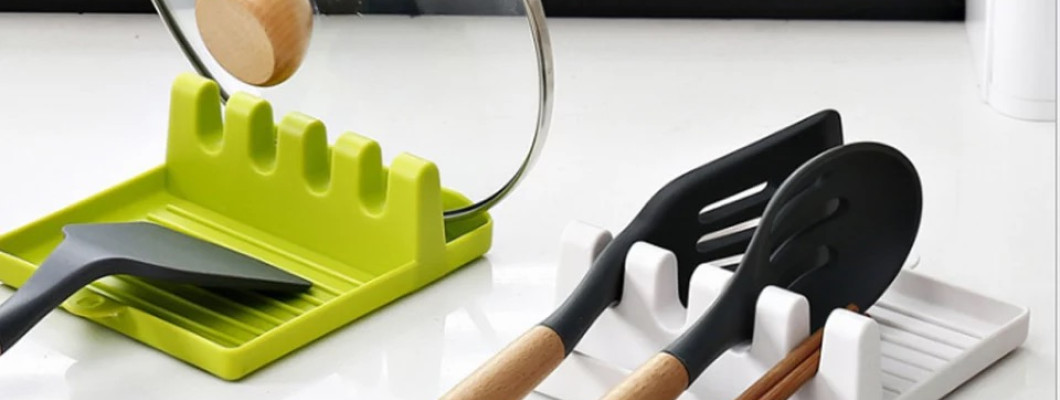
Where to Put Pot Lids and Cooking Spoons: A Practical Guide to Utensil Rests
You lift a lid to check dinner, then realise there is nowhere convenient to put it. The spoon is already resting across a plate, the chopping board is occupied and the clear section of counter is further away than expected.
These small interruptions are often a workspace problem. Before cooking begins, ingredients have their places, but used utensils and temporarily removed lids do not.
A pot lid and utensil rest can provide a designated landing place, provided it suits your equipment and available space. This guide explains how to assess that fit, arrange the worktop and build a practical routine around placing, retrieving and cleaning your cooking tools.
Quick Answer
Choose a utensil rest around the tools you actually use, allowing room for their heads and handles as well as the holder itself. Assess lid compatibility separately, using a cool, dry lid for an initial stability check. Keep a plastic holder away from flames and hot surfaces, and do not assume an unpublished heat rating. A drip tray can collect residue, but still needs cleaning.
Contents
Identify the interruption in your cooking routine
Distinguish temporary resting from cookware storage
Select the utensils before filling the slots
Review the product information
Assess the lid separately
Allow for the full working footprint
Choose a practical counter location
Rehearse before cooking
Organise a meal with several tools
Understand drainage and heat limits
Clean, store and review the arrangement
Checklist and quick answers
Ten frequently asked questions
Step-by-step starting plan
Conclusion and quick summary
Identify the Interruption in Your Cooking Routine
Think about a meal you prepare regularly. At which point do you search for somewhere to put a utensil?
Perhaps it happens when adding ingredients, when checking a covered pan or when moving from stirring to serving. Each situation suggests a slightly different arrangement.
Start with one repeated inconvenience rather than trying to organise every tool in the kitchen. A clear place for the main stirring spoon may solve most of the problem.
Observe where your hands naturally move during the task. The proposed resting place should fit those movements without creating an awkward reach.
This gives you a practical reason for choosing a holder and a clear way to judge whether it helps.
Distinguish Temporary Resting from Cookware Storage
A utensil rest is used during preparation. It is different from a cabinet rack that stores clean pans or keeps a collection of lids upright between meals.
If your difficulty is finding cookware inside a cupboard, a countertop rest addresses a different task. Define the problem before comparing products with similar-looking names.
Also distinguish a lid support from a base for the cooking pot itself. Those are different functions with different requirements.
The useful question is whether you need a temporary place for something currently in use. If so, assess how you will place it down, retrieve it and clear the area afterwards.
Do not expect a small cooking accessory to perform every storage role around the hob.
Select the Utensils Before Filling the Slots
Gather the tools required for your usual recipe. You might need a spoon, ladle, spatula or tongs, but not necessarily all of them at once.
Consider when each tool becomes active and when its job ends. Removing an unnecessary utensil can make the arrangement clearer without adding another holder.
Look at head width, handle length and overall shape. Two tools described as spatulas may occupy very different amounts of space.
Try arranging clean, cool utensils before cooking. Notice whether their handles cross or their heads compete for the same area.
A slot count describes part of a design. It does not tell you how conveniently your particular collection will fit together.
Review the Available Product Information
The K&M Shopping C174 pot lid and cooking utensil rest is plastic and measures 14.5 × 13 × 5 cm. It has four utensil slots, a lower drip tray, a support for a compatible lid and a hanging hole for storage.
The exact plastic type, temperature rating and maximum load are unspecified. Dishwasher suitability is not confirmed.
Product information:
https://k-m.store/shop/en/under-shelf-kitchen-storage-rack
Use these details to understand the intended function and footprint. Do not turn the presence of four slots into a promise that four large tools and a lid will fit comfortably together.
Assess your own equipment, including how you will reach each item when the rest is in use.
Assess the Lid Separately
Choose the lid you actually expect to rest between cooking steps. Consider its diameter, rim shape, handle position and weight rather than comparing appearance alone.
Two lids of similar diameter may sit differently because their edges and handles differ.
For an initial assessment, use a cool, dry lid on a clear, level surface. Keep control of it while checking the arrangement rather than immediately letting go.
If it does not remain appropriately supported, choose another suitable resting place. Do not compensate by wedging it against a utensil or nearby appliance.
A successful arrangement with one lid does not establish compatibility with every lid in your cupboard. Repeat the assessment when the equipment changes.
Allow for the Full Working Footprint
The holder’s dimensions describe its body, but utensils and a lid may extend beyond it. Include that extra space when planning the location.
Long handles can reach into an area where you normally prepare ingredients or pass your hand. A lid may need clearance above and beside the support.
A paper outline of the published footprint can help you visualise the position before buying. Use it as a planning aid, not as evidence of fit or stability.
Place your clean utensils nearby to understand their likely direction. Consider retrieval as well as resting.
The best location is not simply the smallest empty gap. It is a space in which the complete arrangement can be used without interfering with the next cooking step.
Choose a Practical Counter Location
Keep the resting place accessible without requiring you to reach across flames or hot cookware.
Map out the main work areas for the recipe: ingredients, preparation, cooking and serving. Identify where the holder can fit without taking over space needed by one of those activities.
Test the reach using your normal working hand. A layout in a product photograph may not match your kitchen or habits.
If another person cooks with you, include their movement in the assessment. Handles should not extend into a shared route across the worktop.
Do not sacrifice appropriate placement just to keep the holder extremely close to the cooker. When no suitable space is available, reconsider the arrangement rather than squeezing it into a poor location.
Rehearse Before Cooking Begins
Set out the holder and the clean, cool tools for a familiar recipe before switching on the cooker.
Practise putting down and retrieving the main spoon. If you intend to use the lid support, assess it separately and then review access with the other tools present.
Notice whether removing one item requires moving another. Simplify the arrangement if it does.
Check where the used end of each utensil will sit relative to the tray. A convenient handle position is not enough if the dripping head extends beyond the collection area.
This rehearsal helps reveal layout problems. It does not establish an unpublished heat rating or load capacity.
Plan One Simple Cooking Sequence
Imagine preparing a sauce that needs occasional stirring and additions. Decide where the stirring tool belongs before beginning.
When you pause to add an ingredient, return the tool to its designated position instead of searching for an unused plate. Keep other objects out of that small working area.
If the lid is part of the sequence, make sure its placement does not block access to the spoon. You may decide to use separate appropriate resting locations.
Monitor the tray as the task progresses. If residue interferes with continued use, remove the tools and clean it when this can be done safely.
A successful arrangement is one you can repeat naturally. It does not need to use every available slot.
Manage Several Dishes without Crowding the Rest
Cooking more than one dish can introduce different utensils and different residues. Assign each tool a clear purpose.
Do not treat separate slots as separate liquid compartments. Residue may share the same tray area, so spacing alone should not be relied upon to keep tools or ingredients separate.
Where tasks require separation, use appropriate separate resting places or clean the rest between uses. A clean tool should not be placed into residue from an earlier task.
Remove utensils once their role has ended. Keeping every tool used during the meal in one place can make the later stages unnecessarily crowded.
The aim is a clear sequence, not a display of the full collection.
Reset When Moving from Cooking to Serving
The tools needed for serving may differ from those used for preparation. Treat that change as a moment to review the resting area.
Put away or wash utensils whose job is finished. Provide an appropriate clean position for serving tools rather than placing them automatically in the used tray.
Reconsider the lid location too. It may no longer need to occupy the holder while plates are being arranged.
This brief reset can make the serving stage easier to organise. It also prevents the worktop from accumulating tools simply because nobody has decided what should leave.
A temporary resting place works best when its contents change with the task.
Understand What the Drip Tray Can Do
The tray provides an area where some residue can collect instead of landing directly on the counter. The utensil head needs to be positioned over that area for the arrangement to be useful.
It will not catch every drop during movement. Nor should it be treated as a container for transporting or storing quantities of liquid.
If you repeatedly find drips outside it, inspect the tool position and size. The answer may be a different orientation, fewer tools or another suitable rest.
Before moving the holder, remove the lid and utensils and consider any collected liquid.
A tray reduces the area in which residue is collected only when the placement and handling support that purpose.
Keep Heat Compatibility Separate from Intended Use
Being sold as a cooking accessory does not establish a specific temperature limit.
Without a documented rating, do not describe the holder as suitable for all hot utensils or for any lid immediately after removal from the cooker.
Keep the plastic accessory away from flames and hot surfaces. Do not use it as a trivet for a pan or pot.
If your intended use depends on placing very hot items on it, ask for confirmation of suitability. Until that is clear, use an alternative with an appropriate known heat rating.
The product’s function tells you what task it is designed to assist. It does not supply missing material-performance specifications.
Decide Whether a Simple Dish Already Meets Your Need
A dedicated accessory is not necessary for every kitchen routine. If an appropriate dish already provides a practical resting place for one tool, assess whether anything actually needs changing.
A multi-slot rest may be useful when you want defined positions for several compatible utensils or a suitable lid support.
Compare the complete process: placing tools, retrieving them, collecting residue, cleaning and storing the item afterwards.
Do not compare only how tidy each option looks before cooking begins. The useful choice is the one you can use and maintain comfortably.
If your lids are unsuitable or the counter space is too limited, another arrangement may serve the task better.
Clean Before Putting It Away
Remove the utensils and lid before cleaning the holder. Address residue in the slots, corners and tray grooves rather than relying on a brief rinse when food remains.
Follow the product’s hand-cleaning guidance and dry the item before storage. Do not assume that a dishwasher cycle is appropriate when suitability has not been confirmed.
Use cleaning tools that suit the surface rather than scraping it with an unsuitable sharp object.
Inspect the holder as you clean. If cracking or deformation affects support, stop using it and assess its condition.
Cleaning is part of choosing the accessory: a product that you can conveniently care for is more likely to remain useful in your routine.
Use the Hanging Hole for Storage
The hanging hole provides a storage option when the holder is empty. It does not establish that the item should support utensils or a lid while hanging vertically.
During use, follow the intended countertop arrangement. Before storage, empty, clean and dry the holder.
Do not assume that a hook or rail shown in an illustration is included with the product. Assess any separate storage fitting according to its own requirements.
Choose a place where you can retrieve the holder before cooking without moving a stack of unrelated items.
Convenient storage matters because a useful accessory may remain unused if it is always difficult to find.
Review the Routine Weekly
During a normal kitchen tidy-up, consider whether you reach for the holder before cooking or only after the counter has become crowded.
If access is the issue, improve its storage location. If overcrowding is the issue, reduce the number of tools left on it after their jobs are finished.
Notice any utensil or lid that consistently needs another place. It may deserve a separate solution rather than repeated attempts to fit it into the same arrangement.
Review changes after buying new cookware too. A different lid or longer utensil can alter a previously workable setup.
Judge usefulness by easier actions and straightforward cleanup, not by the number of items accommodated.
Common Mistakes to Avoid
Testing an unfamiliar lid while it is hot
Begin compatibility assessment with a cool, dry lid while maintaining control of it.
Equating four slots with four large utensils
Consider head width and handle overlap as well as the openings.
Positioning the rest too close to heat
Keep placement within the product’s guidance and do not invent a temperature rating.
Leaving the used end outside the tray
Check where residue will land, not only where the handle sits.
Putting clean tools into previous residue
Clean or provide another appropriate resting place when the task changes.
Moving the holder while crowded
Remove the supported items before relocating it.
Confusing hanging storage with working use
Treat the storage hole and countertop function separately.
Before-Use Checklist
I have identified the interruption I want to solve.
I have selected the tools needed for the current task.
I have allowed space for handles and the lid.
I have assessed lid compatibility separately.
The holder has an appropriate level location.
The position is away from flames and hot surfaces.
I have not assumed a heat or load rating.
Used utensil ends can sit over the tray.
Clean tools have an appropriate place when tasks change.
I can clean, dry and store the holder conveniently.
Quick Answers
Where should the rest go?
Choose an appropriate level work surface that remains accessible without exposure to flames or hot surfaces.
Should every slot be occupied?
No. Use only the arrangement that allows practical access and suitable support.
Will the counter remain completely clean?
No. The tray can collect residue, but movement and spills still require attention.
When is another option preferable?
Choose differently when fit, temperature suitability or available workspace does not meet your needs.
Frequently Asked Questions
Is this a storage rack for pots and pans?
No. The product discussed here provides temporary resting positions during cooking. Cabinet cookware storage is a different function.
Do the holder dimensions describe all the space it needs?
No. Allow for utensils and a lid extending beyond the body, plus the movement needed to place and retrieve them.
Will every pot lid fit?
That cannot be guaranteed. Assess the particular lid’s shape, rim and balance, and use another appropriate location if support is unsuitable.
Can four utensils be used at once?
Only if their sizes and shapes allow a suitable arrangement. Large heads or crossing handles can reduce practical capacity.
Can a lid and utensils share the holder?
Assess the combined arrangement. Do not assume that a compatible lid leaves enough access for every utensil you want to add.
Is it suitable for very hot cookware?
A temperature rating is not provided. Do not use the holder as a pot trivet or assume compatibility with very hot objects.
Can it go in a dishwasher?
Dishwasher suitability is unconfirmed. Follow the published hand-cleaning guidance rather than assuming a cycle is acceptable.
Do separate slots keep different residues isolated?
Not necessarily. They share a collection area, so use appropriate separation and cleaning between tasks.
Are the pictured utensils, lid and hanging rail included?
The published package quantity is one holder. Do not infer that demonstration items or separate storage fittings are included.
Can I choose the colour shown in a photograph?
Check the current ordering options with the retailer. An image alone does not confirm that a particular colour can be selected.
Step-by-Step: Start with One Familiar Meal
Step 1: List the active tools
Choose the utensils needed during the same stage of the recipe.
Step 2: Select the location
Allow working clearance on an appropriate surface away from heat.
Step 3: Rehearse with cool equipment
Check the tool layout and assess the lid separately.
Step 4: Position for residue collection
Keep suitable utensil heads over the tray.
Step 5: Remove finished tools
Avoid carrying every stage’s equipment into the next.
Step 6: Monitor the tray
Clean when needed rather than allowing residue to interfere with use.
Step 7: Finish the routine
Hand-clean, dry and return the holder to an accessible storage place.
Conclusion
Planning where to put a spoon or lid is part of preparing to cook. A suitable rest can give those items a clear temporary position, but its usefulness depends on your tools, workspace and cleaning routine.
Choose around actual fit, clarify important unknowns and keep the arrangement simple enough to repeat.
Explore kitchen accessories at K&M Shopping:
Quick Summary
Choose a rest for active use, not cabinet storage.
Assess utensils and lids separately before cooking.
Allow room beyond the holder’s footprint.
Do not assume heat or load performance.
Clean between tasks when needed and after use.
Treat hanging as a storage option.
Read Also
Faucet-Mounted Sink Organizer: Fit and Drainage Guide
https://k-m.store/en/faucet-sink-organizer-fit-drainage-guide
This guide considers a separate place for washing tools, helping you organise cleanup supplies independently from utensils currently used for cooking.
Leave a Comment